
AR15 5.56 External Ballistics 101
AR-15 BALLISTICS CHEAT SHEET
MOA vs MIL — What Do They Mean?
Both MOA and MIL are angular measurements.
- They do NOT measure inches — they measure angles.
- The distance determines how much those angles equal in inches.
MOA (Minute of Angle)
1 MOA ≈ 1.047 inches at 100 yards
(For practical purposes, most shooters treat it as 1 inch at 100 yards)
Quick reference:
- 1 MOA ≈ 1” at 100
- 2 MOA ≈ 2” at 100
- 1 MOA ≈ 2” at 200
- 1 MOA ≈ ½” at 50
MIL (Milliradian)
1 MIL = 3.6 inches at 100 yards
Quick reference:
- .1 MIL = 0.36” at 100
- .5 MIL = 1.8” at 100
- 1 MIL = 7.2” at 200
- .1 MIL = 0.72” at 200
MOA vs MIL — Practical Difference:
- MIL is base-10.
- MOA is base-60.
- MIL math is typically faster under pressure.
Example:
If you’re 1 MIL low at 100 yards, dial/hold 1.0 MIL.
If you’re 3 inches low at 100 yards:
- That’s about 1 MIL
- Or about 3 MOA
Know what system your optic uses — and make sure your reticle and turrets match. (Nowadays they almost always do, but that wasn’t always the case.)
Common Scope Adjustments
Different optics adjust in different increments.
Find your click value on the turret, on/under the cap, on the optic housing, or in the owner’s manual.
MIL-Based Adjustments
Most common: .1 MIL per click
- 0.36” per click at 100
- 0.18” per click at 50
Less common: .5 MIL per click (coarse adjustment optics)
- 1.8” per click at 100
- 0.9” per click at 50
MOA-Based Adjustments
- .25 MOA per click — ≈ 0.25” at 100 / ≈ 0.125” at 50
- .5 MOA per click — ≈ 0.5” at 100 / ≈ 0.25” at 50
- 1 MOA per click — ≈ 1” at 100 / ≈ 0.5” at 50
62gr 5.56 Trajectory Comparison
(16” barrel, ~2,900 fps, 2.6” optic height, data collected via Ballistics AE)

25-Yard Zero
25-yard zero gives you a near zero at 25 and a far zero around ~360.
Approximate impacts:
- 50 yards: +2.3”
- 100 yards: +6.1”
- 150 yards: +8.6”
- 200 yards: +9.6”
- 250 yards: +9”
- 300 yards: +6.6”
36-Yard Zero
Near zero: 36. Far zero: ~275.
-
- 50 yards: +0.9”
- 100 yards: +3.2”
- 150 yards: +4.2”
- 200 yards: +3.7”
- 250 yards: +1.7”
- 300 yards: -2.2”
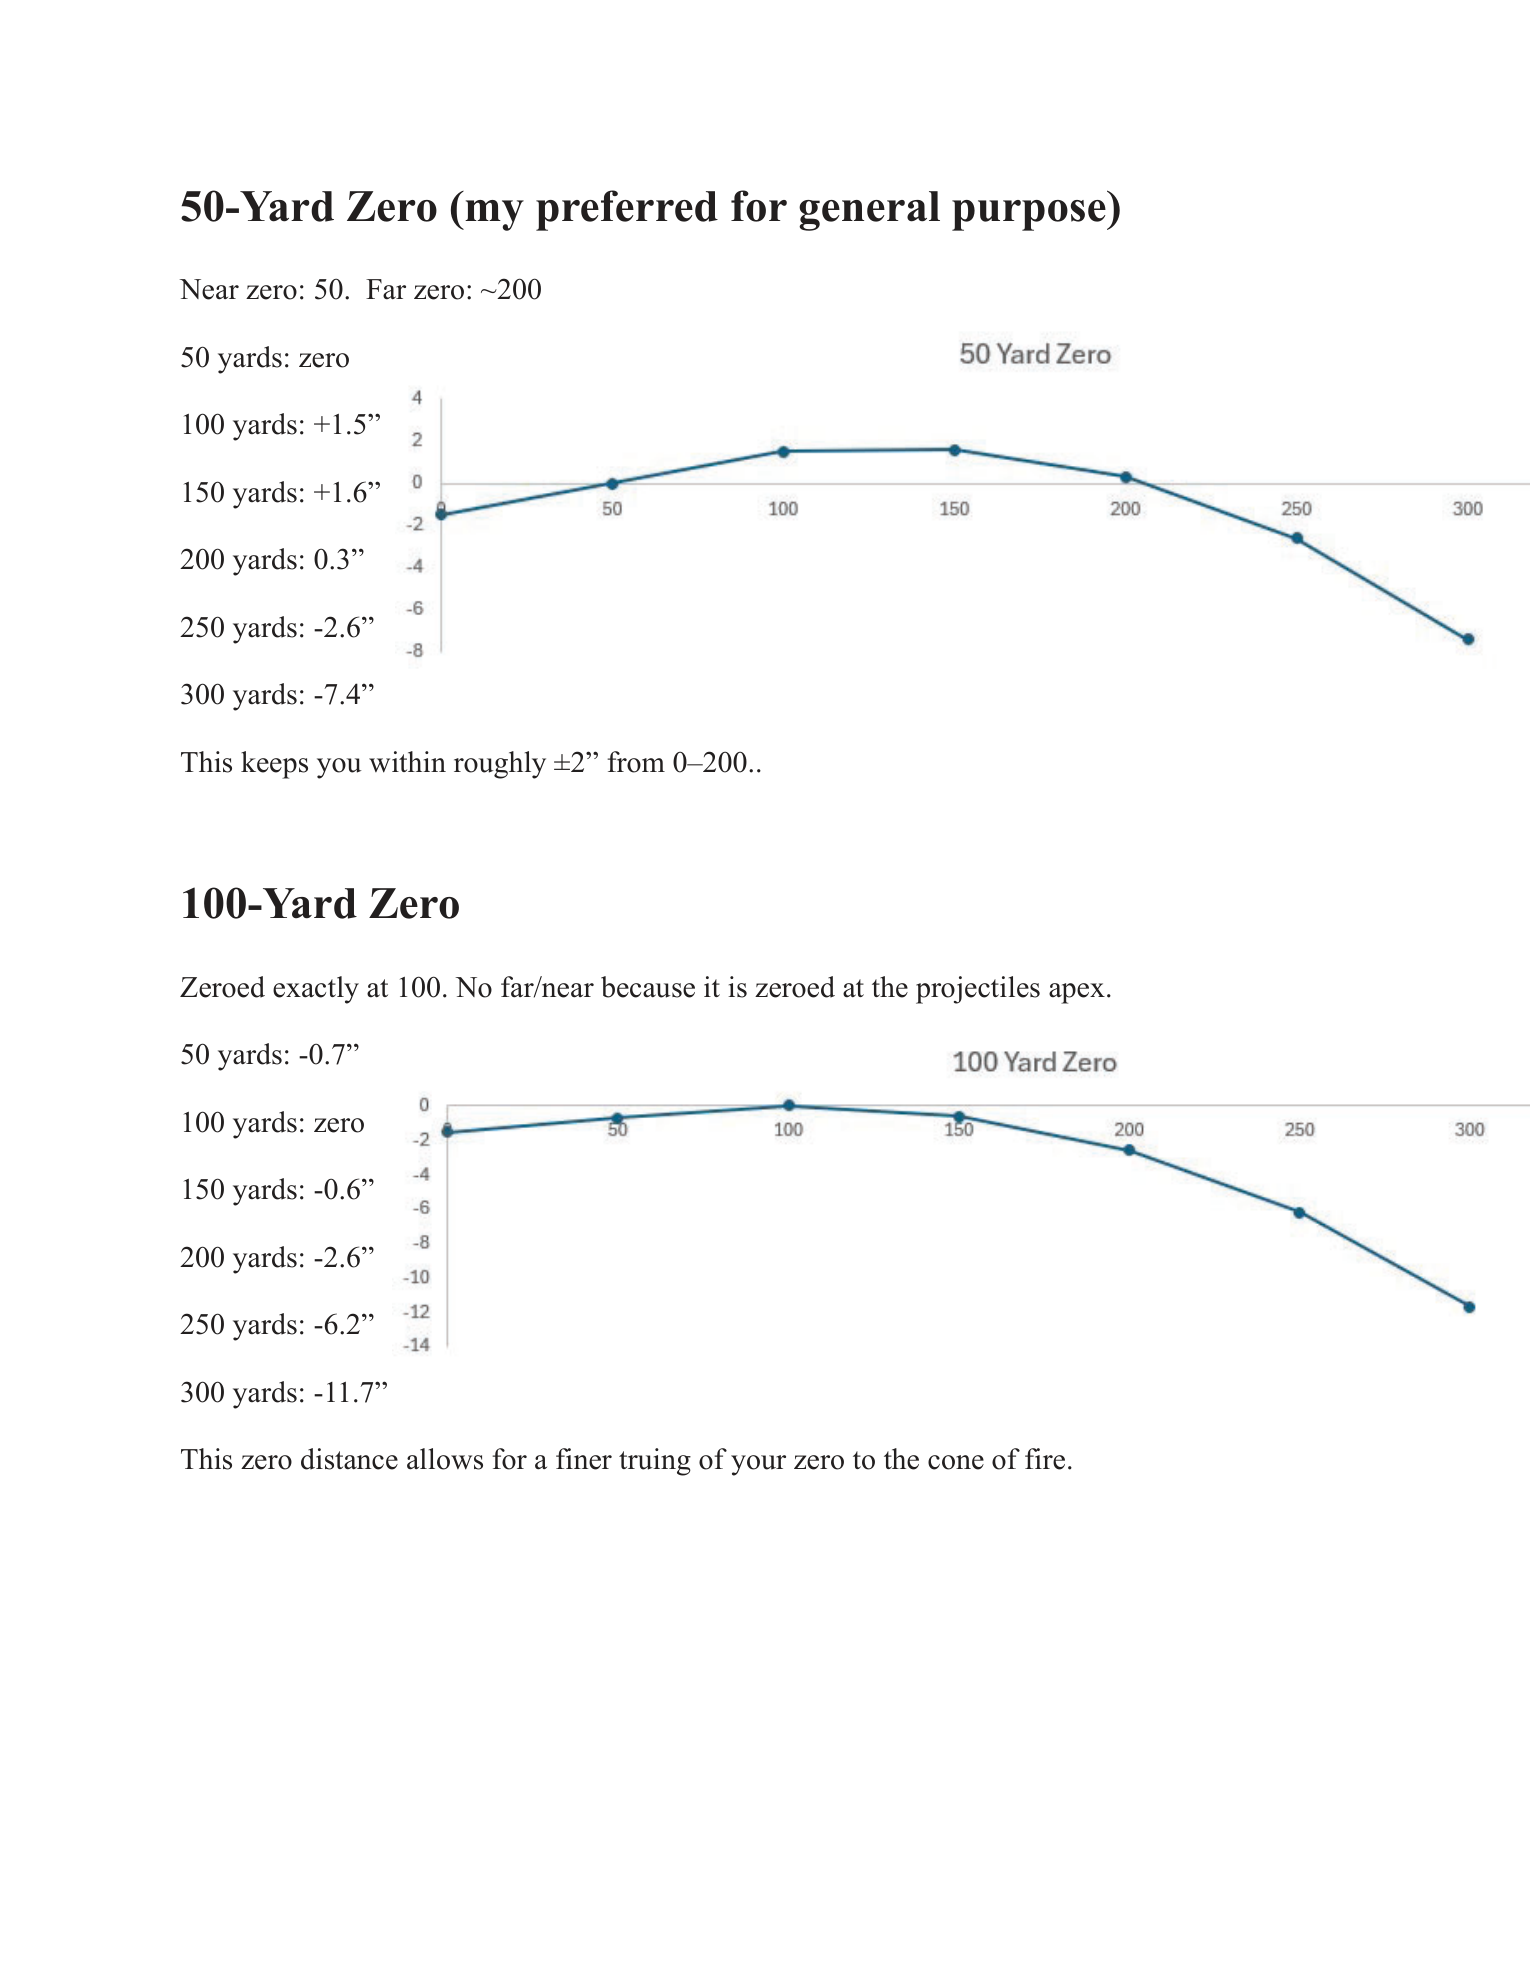
50-Yard Zero (my preferred for general purpose)
Near zero: 50. Far zero: ~200.
- 50 yards: zero
- 100 yards: +1.5”
- 150 yards: +1.6”
- 200 yards: 0.3”
- 250 yards: -2.6”
- 300 yards: -7.4”
This keeps you within roughly ±2” from 0–200.
100-Yard Zero
Zeroed exactly at 100. No far/near because it is zeroed at the projectile’s apex.
- 50 yards: -0.7”
- 100 yards: zero
- 150 yards: -0.6”
- 200 yards: -2.6”
- 250 yards: -6.2”
- 300 yards: -11.7”
This zero distance allows for a finer truing of your zero to the cone of fire.
Mechanical Offset (Critical for All Zeros)
- Your optic sits at least 2.6” above bore.
- At very close range (5–15 yards): you will impact approximately 2–2.5 inches LOW.
Zero to the Cone of Fire — Not a 3–5 Shot Group
A true zero is not based on 3–5 rounds.
- Small groups are heavily influenced by randomness. If you adjust your optic to a tiny sample, you’re often “chasing” instead of centering the rifle’s true dispersion.
- Every rifle/ammo combination produces a natural pattern — often called the cone of fire.
- Your job is to zero to the center of that pattern, not the tightest cluster within it.
Minimum standard: Zero to the center of a cone of fire created with at least 10 rounds.
In Episode 50 of the Hornady Podcast, Hornady’s ballistic team explains that 30-round groups produce the most accurate representation of a rifle’s true cone of fire. Larger samples reveal the truth.
Practical Zeroing Procedure
- Establish a stable position (prone or well-supported).
- Fire a deliberate 10-round group at your intended zero distance.
- Identify the center of the entire group.
- Dial your optic to move the group center to point of aim.
- Confirm with another group.
Do not chase individual impacts.
Adjust to the pattern.An honest zero is the foundation of accountable performance.
Quick Click Guide (Example: 1.5” correction)
| Turret click value | Zero distance (yd) | 1 click equals | Clicks to move 1.5” |
|---|---|---|---|
| .25 MOA | 50 | 0.125” | 12 clicks |
| .25 MOA | 100 | 0.25” | 6 clicks |
| .5 MOA | 50 | 0.25” | 6 clicks |
| .5 MOA | 100 | 0.5” | 3 clicks |
| 1 MOA | 50 | 0.5” | 3 clicks |
| 1 MOA | 100 | 1” | 1–2 clicks |
| .1 MIL | 50 | 0.18” | 8 clicks |
| .1 MIL | 100 | 0.36” | 4 clicks |
Practical Takeaways
- Make your zero perfect and know it.
- Confirm your holds at 50, 100, and 200.
- Understand your click value.
- Account for mechanical offset inside 25 yards.
- Validate — don’t assume.
Whew!